


Hidden American Flag Cake started with Elissa Bernstein (and was actually inspired by her dad : )
For a video of Elissa making this cake, go to:
http://studio5.ksl.com/?nid=71&sid=11199064
Elissa's blog site:
http://17andbaking.com/2009/07/01/a-little-taste-of-independence/
" ... I wanted the cake to be completely white on the outside, keeping the richly colored layers hidden. I also didn’t want to mess around with blueberries and strawberries on the top, which I think are generally pretty common around the 4th. I made my favorite cream cheese frosting and flavored it with lime zest. While the cake was nothing special, I do love this cream cheese frosting, and it’s the easiest to make – no room temperature cream cheese needed!
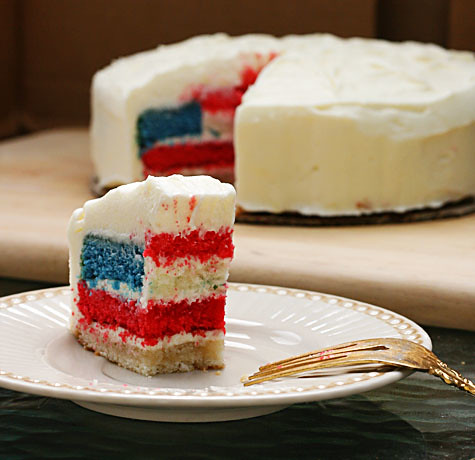
So, want to know how it’s made? :)
Bear with me, it’s a bit hard to explain without pen and paper.
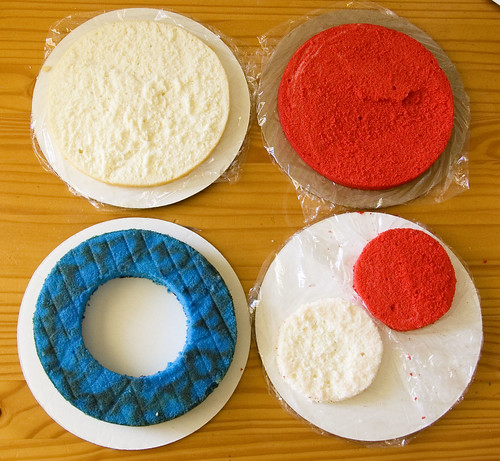
To make the cake, you use three layers of
white cake. Using food coloring, one layer is dyed blue, one is dyed
red, and the last layer is kept white. The three layers are leveled so
they are all the same height. Let’s say each layer is 2 inches tall.
Using a serrated knife or cake leveler,
slice the red and white layers horizontally in half. So you have a blue
layer (2″), two red layers (each 1″), and two white layers (each 1″).
Set one white and one red layer aside, those will be the bottom two
stripes of the flag.
You only want a square of blue in each
slice, not an entire layer. Stack the blue layer, white layer, and red
layer on top of each other. Using a serrated knife, cut a large circle
through all three layers. I used a bowl as a guide. Now you have a ring
of blue (2″), a ring of white (1″), a ring of red (1″), and three inner
circles in each color (the blue is 2″ and the other two are both 1″).
Discard the inner circle of blue and the outer rings of red and white.
To assemble the cake, frost the bottom two
layers together – set the uncut white layer on a plate and spread with
frosting. Top with the uncut red layer. Spread the uncut red layer with
frosting, then set the blue ring on top. Use a spatula to spread a very,
very thin layer of frosting around the inside edge of the blue ring.
This will help keep the blue layer and the two top stripes together.
Place the white inner circle on top of the
uncut red layer, inside the ring of blue. Frost, and top with the red
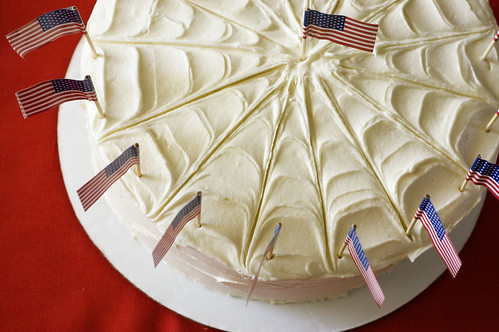
inner circle. Frost the entire cake and voila, it’s a flag cake!
Whew! Make sense? It’s much less complicated than it sounds, truly.
And the result is just too cool. Like I said, I’m not crazy about this
cake recipe but I do like the cream cheese frosting. The best part about
it is that you can use cold cream cheese – not rock hard, but straight
from the fridge is fine. Here it is, plain, but the flavor combinations
are endless… add zest or juice or grated ginger or extract or whatever
you’d like!16 oz cream cheese
10 tbsp unsalted butter, softened
4 tsp vanilla extract
4 cups powdered sugar, sifted
Beat the cream cheese, butter, and extract together until combined. Gradually beat in the powdered sugar until the desired consistency is reached.
~~~~~~~~~~~~~
http://delectabledeliciousness.blogspot.com/2009/07/4th-of-july-fun.html
Perfect Party Cake
from Dorie Greenspan's "Baking: From My Home to Yours"
2 1/4 cup cake flour
1 tablespoon baking powder
1/2 teaspoon salt
1 1/4 cups whole milk or buttermilk (I used buttermilk)
4 large egg whites
1 1/2 cups sugar
2 teaspoons grated lemon zest
1 stick (8 tablespoons) unsalted butter, room temperature
1/2 teaspoon pure lemon extract
1. Preheat oven to 350°F. Spray two 9-inch round cake pans with non stick spray. Optional - line the bottoms with a round of parchment. If using, also spray the parchment with non stick spray.
2. Sift together flour, baking powder and salt. Set aside.
3. Whisk together the milk and egg whites in a medium bowl. Set aside.
4. In the bowl of your electric mixer, combine the sugar and lemon zest and rub the lemon zest into the sugar with your fingers until well incorporated. The mixture will become moist and very fragrant.
5. Add the butter to the sugar/zest mixture and, using the paddle attachment, beat on medium speed for a full 3 minutes. Add the lemon extract and 1/3 of the flour mixture; add 1/2 of the milk/egg white mixture and continue to beat at medium speed, then add half of the remaining flour mixture, then the rest of the milk/eggs and finish with the remaining flour. Once all ingredients are combined, beat the batter for a good 2 minutes to ensure it is thoroughly mixed and well areated.
6. Pour into prepared pans and bake for approximately 30 minutes, or until a toothpick inserted into the center comes out clean.
White Chocolate Frosting
adapted from foodnetwork
*note: I doubled this recipe to frost the flag cake and had some left over
5 ounces good quality white chocolate, chopped fine
2 sticks (1 cup) unsalted butter, room temperature
3 cups powdered sugar, sifted
pinch salt
1/2 teaspoon vanilla extract
1/4 cup sour cream
1. Melt white chocolate over a double boiler or in microwave. Set aside to cool.
2. In the bowl of an electric mixer fitted with the paddle attachment, beat the butter until light a fluffly. Slowly add the powdered sugar until well combined.
3. Add the salt, vanilla extract and sour cream and beat until very smooth.
4. Add the melted white chocolate and beat just until combined.
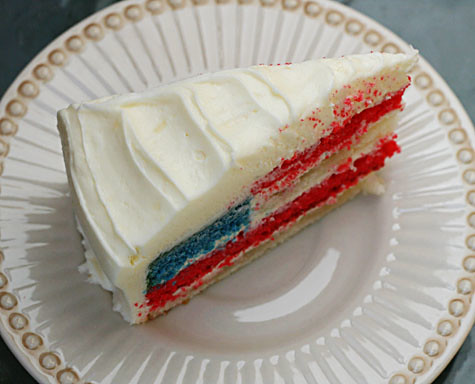
Now for the fun part!
As for how to assemble this cake, Elissa did a great job of explaining it on her blog. I'm going to break it down for you:
1. You'll have 3 cakes - red, white and blue. Using a serrated knife or cake leveler (best bet to getting even layers!) cut both the white and the red cakes horizontally so that you now have two layers of each. Set aside one layer of both the red and the white - these will be the two bottom stripes of your flag.
2. Stack the remaining red and white layers and place the blue cake on top.
3. Place a bowl or any circular guide (approximately 3 or 4 inches in diameter depending on how big you want your blue square to be in each slice) in the center of the stacked cakes. Cut around your guide through all three cakes.
4. Discard (read: eat) the inner circle of blue and the outter rings of the red and white. You will then have an outter ring of blue cake along with two small, round red and white layers. Looks like this:
5. Frost your bottom two layers of cake (red and white) then place your blue ring on top of that; spread a thin layer of frosting on the inner circle of the blue ring. This will help stick the blue and the top two red and white layers together.
6. Frost the middle of the two small red and white layers; being careful to pay attention to the way you've already stacked/frosted the bottom two red/white layers, place the small red/white layers into the center of the blue ring.
7. Frost the outside of the cake. (You may want to use a crumb coat first, to keep your frosting white and crumb free).
Ta-da!
~~~~~~~~
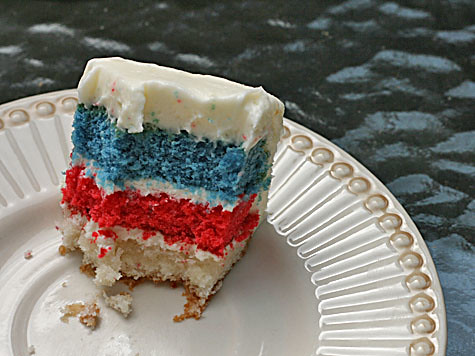
Hidden Flag cake

(This cake is round, on the Duncan Hines website it is square)
Ingredients:
•2 boxes of Moist Deluxe Classic White Cake Mix (1-tint with Royal Blue, 1-keep white)
•1 box of Moist Deluxe Strawberry Supreme Cake Mix (tint with Red No-Taste)
•Food Color Gel: Wilton Red No-Taste & Wilton Royal Blue
•White Icing: Buttercream or Whipped Cream of your choice
•Pudding or Icing for between the layers
•Red & Blue Sprinkles
1.Bake 1-white cake, 1-blue cake, and 1-red cake in 9x13 rectangular pan
2.Slice the red and white cake horizontally in 3-same height. Cut the blue cake vertically into 4-same width (9" divide 4), we only need 2-pcs of 1/4 of the blue cake.
3.The stacking order is: red (1st slice), white (1st slice), red (2nd slice), white (2nd slice). Spread with pudding/icing in between layers before you stack the cake slices.
4.Next, cut the 3rd slices of red & white into 2-same width (9" divide 2). Stack (red, white, red) on the center of the cake, then put the 1/4 of blue cake on the right & left side of the cake. Remember to spread with pudding/icing in between to make all the layers stay together.
5.Cover the cake with buttercream/whipped cream and it's ready to SURPRISE everyone.
6.To serve it: cut in half the long-side of the cake, then slice it to serve to the guests, so everyone could get the flag-cake.
7.Enjoy... Happy Baking ;)
Comments on the site:
~ Straight Talker: "... cake is vanilla cake colored blue, and red "torted" (sliced) into thin layers...white stripes are buttercream...divide the cake into thirds...can bake it in three pans, or you can use one tall and one regular pan. Either way, color two thirds red and one third blue and bake. Then torte the red layer(s). Cut the blue to the size you want (a little more than half the radius of the cake is what I used) and cut the same size out of 4 of the torted layers of red. Then switch the layers. The extra is a snack!
~ kiannafleur: "...can see why it's so sweet when a thick layer of white buttercream frosting is used to make the white stripes. I think you could use a white cake for those layers, then you'd just have to use the thinnest possible layer of frosting to bind them all together. Another option is to use less-sweetened homemade whipped cream, tho of course keeping it chilled is then a problem.
~ Wendy: (re: what is "Torted") To slice a cake into thin layers... Usually you would put frosting or some type of filling between the layers... (You should probably freeze the cake before trying or you will have a crumbly mess)~ One of the best ways to torte is to slide a thin wire down two sticks or dowels of the thickness you want, placed on each side of the cake layer you want to split.
~ Enlightenment: "...using floss (un-used)and cuts her layers the thickness she wants them
~ Katie NeSmith: If you don't want to cut the layers, Put 1/2 to 1 cup of batter (depending on size of layer you want) into an 8" pan, bake for approx 12 minutes or until done. This makes thin layers which is how I do my 7, 10, and 14 layer caramel and chocolate cakes.
~ Bill.Longland: What? No Stars!! Kidding, very cool cake.
~ Pompous hack: "... some of the comments floating around about this cake not having 15 stripes. Really! Does anyone know how hard this cake must have been to make...To the morons who counted the stripes.. Let them EAT CAKE!
~ Jason: "... It should only have 13 stripes either way, not 15. :)
~ "... And as for the stripes, there are only 13 stripes on the flag
~ Meaghan Baeza: "...7 red, 6 white
~ PastryChef: " ...sweetness of the buttercream, the solution is actually very simple---make your own buttercream. I'm referring to REAL buttercream, not the crap they sell in stores. There are actually 5 types of buttercream: French, Swiss, Italian, American, and German. The last 2 are not considered "true" buttercreams b/c of the veg. shortening (Crisco) but they are the only 2 that are room temp. stable (the other 3 must be refrig). Anyway, in my opinion the Swiss or Italian buttercreams would be ideal in this application. The Swiss is the easiest: make a Swiss meringue and add butter and any other flavors (vanilla for ex.) basically. It is very easy to control the amount of sugar this way
~ lovelynjlady: "...make three large layers of white cake and one small layer ... (small layer) Color the batter for the small one with blue food coloring...batter for the other layers with red food coloring...After cooling, cut the red layers into thirds making 9 layers. Build the first 5 layers with white vanilla icing (in between the red layers). Then set the blue layer on top. Place the small cake pan on top of the last 3 layer cake layer and cut around it to make 3 layers with a hole in the middle each. Put icing and each layer with a hole, ending with a red layer til it comes to the top of the blue layer. Ice the entire top and sides of cake with the rest of the white vanilla icing. Decorate.
~~~~~~~~~~~
http://duncanhines.com/recipes/cakes/gunawanfamily/the-hidden-american-flag-cake

This cake is a perfect choice if you want to impress and surprise
all the guests. You only need simple white icing (maybe with some
sprinkles on top) to cover the cake.
Give the honor to one of your guest to cut the cake and you'll see
his/her surprise face while he/she's cutting the cake.
Thank you "17 and Baking" for her inspiration ;)
- 2 boxes of Moist Deluxe Classic White Cake Mix (1-tint with Royal Blue, 1-keep white)
- 1 box of Moist Deluxe Strawberry Supreme Cake Mix (tint with Red No-Taste)
- Food Color Gel: Witlon Red No-Taste & Wilton Royal Blue
- White Icing: Buttercream or Whipped Cream of your choice
- Pudding or Icing for between the layers
- Red & Blue Sprinkles
Bake 1-white cake, 1-blue cake, and 1-red cake in 9x13 rectangular pan
Slice
the red and white cake horizontally in 3-same height. Cut the blue cake
vertically into 4-same width (9" divide 4), we only need 2-pcs of 1/4
of the blue cake.
The stacking order is:
red (1st slice), white (1st slice), red (2nd slice), white (2nd slice).
Spread with pudding/icing in between layers before you stack the cake
slices.
Next, cut the 3rd slices of red
& white into 2-same width (9" divide 2). Stack (red, white, red) on
the center of the cake, then put the 1/4 of blue cake on the right &
left side of the cake. Remember to spread with pudding/icing in between
to make all the layers stay together.
Cover the cake with buttercream/whipped cream and it's ready to SURPRISE everyone.
To serve it: cut in half the long-side of the cake, then slice it to serve to the guests, so everyone could get the flag-cake.
Enjoy... Happy Baking ;)
Comments on the site:
~Great idea !!! I live in Canada and would love to try making the
Canadian Flag but I think the maple leafe would be very hard to do ...
Will probably experiment though.
~This cake was actually invented by Elissa Bernstein of 17 and Baking. She should be given some credit.
~Elissa is the first one who received the photos from me and all the link
before I gave out to everyone. She did reply me in her FB, then I share
all the photos and link to everyone in DH FB & website. I thank her
for her inspiration and her kindness for sharing her talents to all of
us. You could go to her FB to check it out. I even mentioned her in
the description above and my friend who wrote the tutorial in her blog
also mentioned and gave the credit to Elissa.
~~~~~~
another site's recipe (sorry, closed it out before I got the site/address)
~~~~~~
another site's recipe (sorry, closed it out before I got the site/address)
Ingredients
| 2 bx | white cake mix |
| 1 1/2 btl | red food coloring |
| 1/2 - 1 btl | blue food coloring |
| 4 - 6 c | buttercream frosting |
| assorted red, white & blue decorations | |
| SUPPLIES NEEDED: | |
| 2 | 10" round cake pans |
| 1 | 6" round cake pan |
| 2 | round decorating tips |
| 2 | decorating bags |
Directions
Make 1 box cake mix according to directions on package - adding 1 bottle of red food coloring in 2 10" round cake pans.
Cool completely. Wrap with saran wrap & freeze until firm. (This will make it easier to cut into thin layers).
Cool completely. Wrap with saran wrap & freeze until firm. (This will make it easier to cut into thin layers).
Make the other box cake mix according to directions on package. Reserve
3 cups (white). Add the other 1/2 bottle of red food coloring to
remaining cake mix.
Color the reserved white mix with the blue food coloring.
In 1 10" round cake pan, pour 1/2 of the red cake. In the other 10" round cake pan, place a 6" round cake pan (centered). In the 6" round cake pan, pour the blue cake mix in. In the outside layer, add the red cake mix in.
Bake according to directions on package. Cool completely. Wrap with saran wrap & freeze until firm. (This will make it easier to cut into thin layers).
Make or buy your favorite buttercream frosting for about 4 - 6 cups. It's better to have too much than too little.
Before starting, you should have:
3 - Full 10" Round Red Cake Layers
1 - 10" Round (Circle) Red Cake Layer
1 - 6" Round Blue Cake Layer
Only bring out of the freezer 1 red cake layer at a time. Cut each red cake layer in 1/2. Each layer you cut, add a thin layer of white frosting.
So you should have about 6 layers of full red cake layered with white frosting. And 2 round circle layers of red cake. DO NOT CUT BLUE CAKE! (just place on top, center)
So you should have 8 layers of red, 7 layers of frosting & 1 full blue layer cake in center (see picture). Decorate outside of cake as desired.
No comments:
Post a Comment